|
[ HOME ]
|
|
Model Information
|
|
|
|
VW Service
|
|
|
|
Winnebago Service
|
|
|
|
Tours & Pictures
|
|
|
|
►
Related
Links
|
| |
The Continental part numbers for the belts, on units with a/c, are:
6PK2130 AAF & early ACU (5 cylinder)
6PK2236 later ACU (5 cylinder)
7DPK1400 AES engine (early 6-cylinder)
7DPK1360 AXK engine (later 6 cylinder, double sided)
We've found several sources for just the pulley on the 6 cylinder models, instead of having to buy the entire tensioner
from VW. They're all just a tad different in size than the original, but work fine. (Don't forget that the
center bolt is left-hand threads!) The part numbers are:
Dayco 231108 or 89008 (polymer pulley, ~$15)
Gates DriveAlign 36320 (steel pulley, ~$20)
4 Seasons 45032 (aka Murray, non replaceable bearing, composite pulley, ~$13.50)
Original Source:
http://forums.vwvortex.com/zerothread?id=1138497
(Note: These pictures are NOT on a Eurovan, but will give you an idea of what you're looking for.)
Posted by: Gary (VgRt6)
REMOVING A VR6 SERPENTINE BELT TENSIONER AND LUBRICATING THE
TENSIONER PULLEY BEARING
The following outlines the procedure for removing the serpentine
belt tensioner from a VR6 engine and lubricating the tensioner pulley bearing.
It is common for the bearing in the pulley to dry out, causing the bearing to
become very noisy when the engine is running and eventually, to fail. The lubrication
of the bearing as preventative maintenance or at the first sign of noise can significantly
extend the lifetime of the tensioner pulley. Since VW does not sell the pulley
separately, lubricating the bearing with a few cents worth of grease before bearing
failure can prevent you from having to (1) purchase a whole new OEM tensioner
unit for $100-200 (depending on where you buy it from), (2) purchase an aftermarket
pulley (such as the Adrenalin version) for $50-$100 [ Note: The pulley with a replaceable bearing was available from
German Auto Parts, but hasn't been on their site for awhile] or (3) buying a new bearing
and spending the time and/or $$$ to install it in the existing pulley.
Please do these procedures at your own risk and be ready to
make small adjustments while doing them. Also, please be observant while removing
parts so that they back together correctly.
The procedure below is very simple and should take around a
half an hour to perform.
The tools/parts needed to perform the procedures are:
T30Torx driver (not needed for Eurovan AES or AXK engine)
M8x**x1.25 pitch bolt, where ** is the length in mm (available at Home Depot,
Lowe's or other hardware stores).
13mm socket or wrench
15mm socket or wrench
Small flat blade screwdriver
High-temp wheel bearing grease or other suitable lubricant
6mm hex wrench or socket (if the bolts on your VR6 removed in Step 5 are
this type)
|
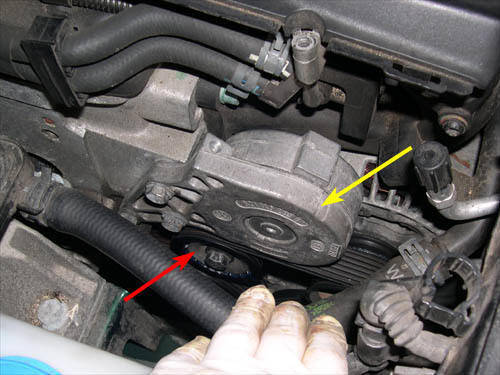
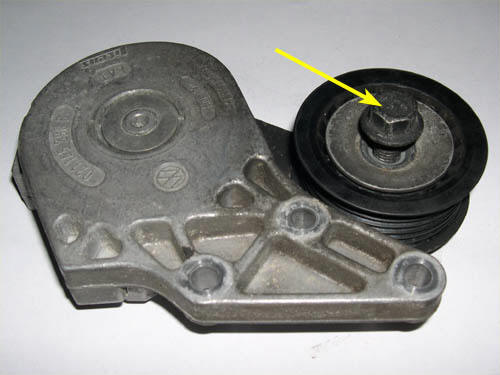
1. The serpentine belt tensioner is indicated by the yellow arrow in
the picture below. The tensioner pulley which applies force to the serpentine
belt is indicated by the red arrow.
|
 |
|
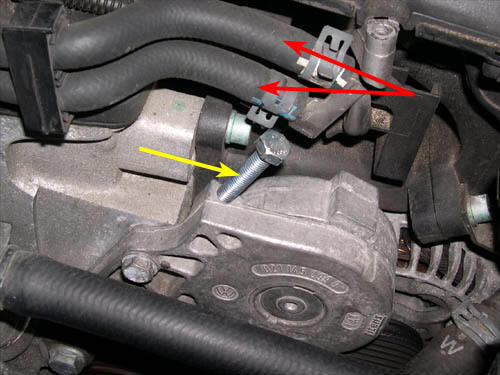
2. To remove the tension from the serpentine belt, thread a M8x**x1.25
pitch bolt into the threaded hole in the top of the tensioner unit (as indicated
by the yellow arrow in the picture below) and turn using a 13mm socket or
wrench until the serpentine belt is loose. ** is the length of the bolt
in mm and will depend on the model year/version VR6 you have. Basically,
you need a bolt that is long enough to fully remove the belt tension before
the bolt head threads in completely, but is short enough to not interfere
with the fuel lines overhead (red arrows in picture below).
|
 |
|
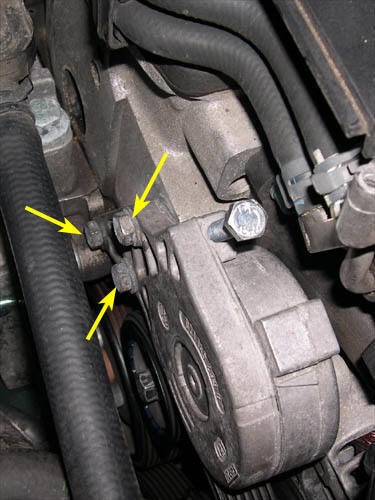
3. Once the belt tension has been removed, remove the tensioner unit
from the engine by removing the three (3) 13mm bolts indicated by the yellow
arrows in the picture below (Note: On some cars, these bolts will be 6mm
hex instead). When the three bolts are out, slide the serpentine belt towards
the passenger's side of the car and off of the tensioner pulley. You should
now be able to remove the tensioner unit from the engine.
|
 |
|
NOTE: If you do not plan on lubricating the pulley
bearing and reinstalling the tensioner back onto the engine right away,
I recommend that you remove the M8 tension-release bolt to release the extra
tension from the spring inside the tensioner. While not likely, it's possible
that the spring may be damaged or deformed if it sits for too long in an
over-tensioned state. If you do remove the tension, make sure to thread
the M8 bolt back into the tensioner and reapply tension to the spring before
reinstalling the tensioner onto the engine. If you don't, you will not be
able to get the serpentine belt back onto the tensioner pulley.
|
|
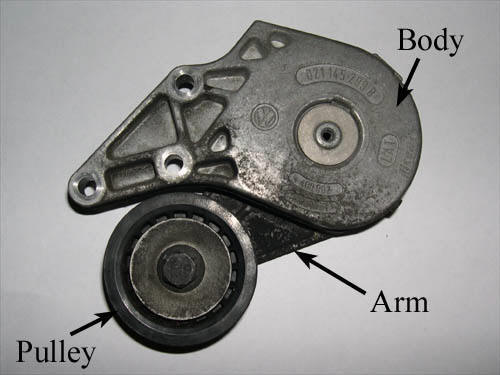
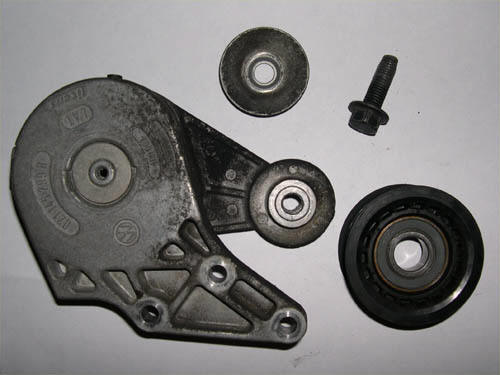
4. The picture below shows the three main parts of the tensioner unit
- the main body, the spring-loaded arm and the idler pulley.
|
 |
|
5. Remove the pulley from the tensioner arm by removing the 15mm bolt
indicated by the yellow arrow in the picture below (shows the bolt partly
removed). NOTE: THE BOLT IS REVERSE THREAD. TURN IT CLOCKWISE TO REMOVE!!!
|
 |
|
6. The picture below shows the pulley removed from the tensioner unit.
Note that there is a pulley guard (top center of picture) that is used between
the bolt and pulley.
|
 |
|
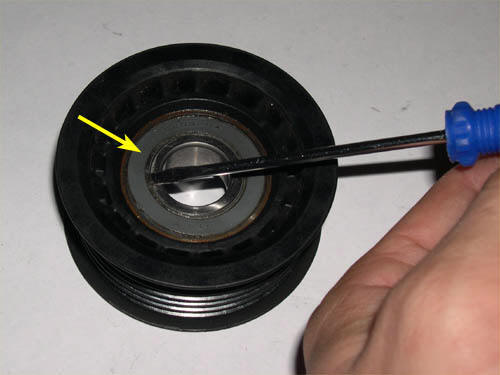
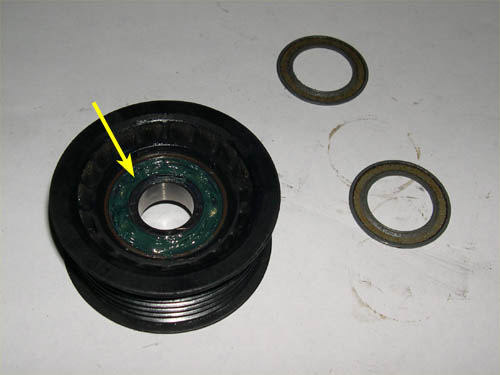
7. Use a small screwdriver to remove the seals from each side of the
pulley bearing, as shown in the picture below. To do this, insert the screwdriver
between the seal and inner race and VERY CAREFULLY pry the seal upward.
Make sure you do not damage the rubber coating on the seal or it may not
stay in place when reinstalled.
|
 |
|
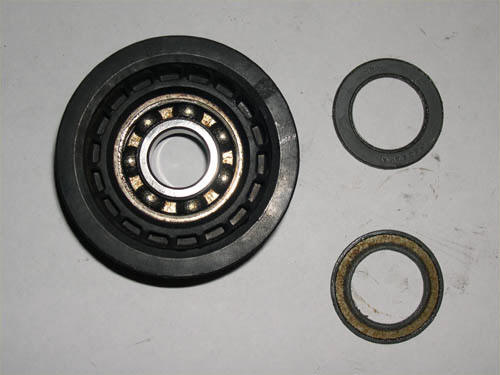
8. LUBRICATING THE TENSIONER PULLEY BEARING
The picture below shows the tensioner pulley with both bearing seals
removed.
|
 |
|
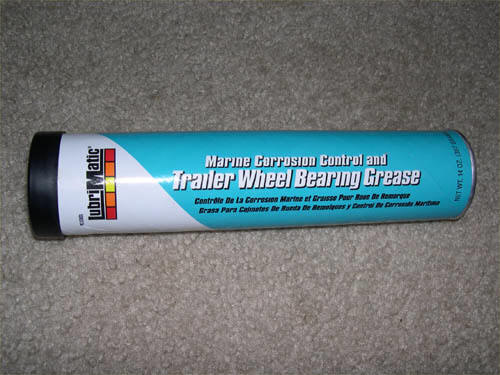
9. Pack each side of the bearing with some high temp. wheel bearing grease
or another suitable lubricant, as shown in the picture below. You can also
add a drop or two of oil to thin out the grease if it's very thick.
The grease that I used is shown in the picture below. I purchased it
at either Home Depot or Lowe's (can't remember) for around $3-4.
|
|
|
10. Once the bearing has been packed with grease, carefully reinstall
the bearing seals. MAKE SURE THAT THE SEALS ARE INSTALLED FULLY OR THEY
WILL WORK THEMSELVES LOOSE AND WEAR AGAINST THE PULLEY GUARD OR TENSIONER
ARM WHILE THE PULLEY SPINS.
Reinstall the pulley onto the tensioner unit and then reinstall the tensioner
unit back onto the engine by following steps 2-8 in reverse. Remember that
the pulley bolt is REVERSE THREAD - turn it counter-clockwise to tighten.
If you have a torque wrench, the torque spec for the tensioner-to-engine
bolts are 18 ft-lbs. I could not find the torque spec for the pulley-to-tensioner
bolt, but 30 ft-lbs should be appropriate.
After reapplying tension to the serpentine belt and BEFORE starting the
engine, check to see that the belt is properly positioned on ALL of the
pulleys that it contacts.
|
 |
|
