|
The VW fuel pump relay has a nasty habit of failing thus leaving you stranded in the
middle of nowhere. And not all VW dealers, if you can find one nearby, will carry
a replacement in stock. Worse yet, most will be incapable of properly diagnosing
a failed relay and will insist on replacing a much more expensive fuel pump only
to find out the problem still exists.
Thanks to some ingenious thinking by the Rialta owners, this mod explains the
process of merely connecting a 12V jumper across two relay sockets which will then
send power to the fuel pump and you can continue merrily on your way. This is a
temporary modification only and upon arrival at your destination or whenever you
shut the engine off, you MUST remove this jumper wire.
First a little background on how it all began:
Message 5791 of 8051
From: "jrstem32935" <jrstem32935@y...>
Date: Wed Oct 23, 2002 6:11 pm
Subject: Fuel System Failure:
Fuel System Failure:
97 EV Rialta VR6 w/62K miles - When attempting to leave from our campground, the
Rialta refused to start. It would crank but would not "fire." Not having anything
to work with and not being familiar with the area as far as repair facilities
and no transportation, we were stuck. One of the campers was local and did ask
a local garage, which had done work for him, if he could work on a EuroVan. He
was told no. We ended up towing the Rialta 150 miles home using a dolly. I called
about 10 repair facilities in our area. Only one said that they had worked on
ONE. Another said that he could probably fix IT. The local VW shop will read the
error codes but not work on them. So rather than tow the Rialta to someone who
might not know as much about the vehicle as I do, I decided to repair it myself
(I hoped).
I poured some gas into the manifold and tried to start it. It
ran until the gas was used up. So the problem was fuel and not ignition. I was
glad of that. Using the Bentley manual I determined that the fuel pump relay was
bad. The Fuel Pump Relay is in relay panel position 12 (lower right hand corner).
It is cube shaped, 1 inch on each side, stamped with the number 167 on the top.
I pulled the relay out and applied 12 volts to the socket that pin #87 of the
relay was plugged into. (This will be a vertical pin on the left side of the relay
socket as you look at it.) If you pull the relay and look on the pin side, you
will see the number. I used a 10-foot piece of #14 wire with an alligator clip
on one end and a piece of metal on the other end that was plugged into the relay
socket. (I used the Coach batteries for the 12 volts.) This applied 12 volts directly
to the fuel pump. There are two fuel lines used by the fuel pump, supply (black)
and return (Blue) running close and parallel to each other. The supply and return
lines from the fuel pump are located on the front, top, right hand side on the
engine as you stand in front of it. The return line goes to the fuel pressure
regulator (kind of looks like a little hat). I disconnected and extended the fuel
supply line and checked it for good flow. (No fuel flowed with the relay in place.)
The Fuel Pump relay (stamped 167 on top) VW part number is 191-906-383C.
The cost $15.++. The reason for all of the detail is that had I known to apply
12 volts to that relay pin and had the jumper wire made up, I could have driven
the vehicle home. (You could make a short jumper to jumper between pin numbers
30 and 87 of the relay socket. Think that I will.) Instead it cost a little over
$200 to get it home and one days time. I have since purchased a long thin-necked
funnel (Wal-Mart) that will allow me to get gas past the Throttle Body and into
the manifold. I keep it in the "boot". I have also made up a kit of tools that
are required to perform the necessary basic maintenance (my jumper wire is in
there). Is this the typical life of this relay? I don't know. The VW parts man
walked right over to the part bin after looking at the relay. (Wonder how many
of them that they use in a month.) But it wouldn't hurt to find and look at the
relay, get the funnel and make up the jumper wire. It might save you some money
and aggravation on a trip. I think that I am becoming a little disenchanted with
the VW power train. When they run they are beautiful, but getting them fixed on
the road or at home is/can be a problem. Spark Plug and Brake Pad replacement
are my next maintenance items.
John
Message 5852 of 8051
From: "jrstem32935" <jrstem32935@y...>
Date: Tue Oct 29, 2002 1:22 am
Subject: Re: Fuel System Failure:
I made up the jumper to troubleshoot the problem but then got
to thinking that I probably would not like to drive with the wire hanging down
from the relay panel so I soldered a jumper across the contacts of the BAD or
FAILED relay and put it in my Rialta tool box. (Imagine driving down the Interstate
and having the wire fall out and shut you down in heavy traffic.) If it ever happens
again all I have to do is plug in the old relay and the fuel pump will have power.
Just have to remember to unplug it when you stop. But it will get me home. Using
the "jumpered old relay" makes it easier to find the correct pins on the relay
socket. But you could carry a spare if you would feel better about it. I just
don't know what kind of failure rate this relay has. Mine lasted for 60K miles.
The contacts are rated at 20 amps and I don't think that the fuel pump draws that
much current. I looked at the contacts and they did not look that bad - BUT IT
DID NOT WORK. I guess that I just don't want to spring for the $15.++. So I will
keep my "Jumpered Old Relay" - for now.
John
From: "jrstem32935" <jrstem32935@...>
Date: Sun Jun 15, 2003 7:48 pm
Subject: Re: throttle body, mass air
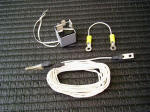 I
just uploaded some Pic's to the "Files" section. One picture shows the relay that
I jumpered. (The two wide lugs that are at right angles to each other.) The short
jumper is used to jump the two sockets that the two wide lugs plug into. One will
be 12V; the other will go to ground through the fuel pump relay. I used some lugs
because they were handiest. They were a little thin and would not stay in the
socket so I built them up with some solder to make them the same thickness as
the relay lugs. I used a Micrometer to measure their thickness. If you do this
make sure that you do not make them TOO THICK. If one were to FORCE them into
the socket, you might SPRING the contacts in the relay block and make them unusable
when used with the relay. The other jumper (my first attempt) got its 12V from
the coach batteries. This long wire bothered me as it could be accidentally pulled
out while driving. That's why I made the short jumper. I
just uploaded some Pic's to the "Files" section. One picture shows the relay that
I jumpered. (The two wide lugs that are at right angles to each other.) The short
jumper is used to jump the two sockets that the two wide lugs plug into. One will
be 12V; the other will go to ground through the fuel pump relay. I used some lugs
because they were handiest. They were a little thin and would not stay in the
socket so I built them up with some solder to make them the same thickness as
the relay lugs. I used a Micrometer to measure their thickness. If you do this
make sure that you do not make them TOO THICK. If one were to FORCE them into
the socket, you might SPRING the contacts in the relay block and make them unusable
when used with the relay. The other jumper (my first attempt) got its 12V from
the coach batteries. This long wire bothered me as it could be accidentally pulled
out while driving. That's why I made the short jumper.
John
98 VR-6 Rialta
That's the secret to jumping the fuel pump relay: either make up a short jumper
wire with flat terminals on each end that will plug into the relay socket or solder
a wire across the two large terminals on an old relay to use as a temporary fix.
Click on the photo above to see the relay and the jumper wires described.
Additional Modifications:
| 
