Transmission Dip Stick

 [ HOME ]

Model Information

Miscellaneous
Accessories
Floor Plans & Specs
How To Buy Or Sell A Rialta
Known Problem Areas
Modifications, VW & Coach
New to RVing? Info here
Pros & Cons of a Rialta
Vehicle Checklist
VIN Information
Winter RV Storage

VW Service

Air Conditioner
Brakes
Door & Locks
Engine Battery
Engine Repair Information
Filters
Fuses: Dash & Engine
Mechanics & Dealers List
NHTSA Recall Notices
Oil Change
Parts Diagrams
Radiator & Coolant
Serpentine Belt
Service & Tech Bulletins
Spark Plugs & Ignition Wires
Transmission Service

Winnebago Service

Appliance Recalls
Bulbs
Caulking and Sealants
Coach Batteries
Electrical Breakers & Fuses
Furnace & Thermostat
Generator
Microwave, Range & Oven
NHTSA Recall Notices
Paint Codes
Parts Catalog
Plumbing Diagrams
Refrigerator
Service Bulletins
Shocks and Air Springs
Shower
Supplier Links
Tires & Wheels
Toilet
Water Heater
Water Pumps & Filters
Winnebago Corporate Info
Wiring Diagrams

Tours & Pictures

Public RV Sanitary Dumps
Strange & Unusual Places
Winnebago Factory Tour

   ► Related Links


Installation of a dipstick kit

There are now two versions of the tube installation information. The first is for the new tubes without the upper bracket. The second is for the original tubes that are no longer available from VW.

New style dipstick kit

All the info is in this file: Transmission Dipstick Kit Installation (85KB)


Original instructions

The following modification was posted on the EV_Update group on Yahoo by Harry Pinchot, owner of a '97 EVC.  It was additional posted on the Tech Rally group on Yahoo in September 2004. PDF (9KB)  (Some comments have been added by Baldy in May 2006 and these are italicized.)

Automatic Transmission Dipstick

EuroVans and Rialtas with the VR6 engine and automatic transmission (01P) do not have a dipstick or normal filler tube for the transmission.  The 01P automatic transmission is equipped with a short filler tube, which is capped with a red plastic cover.  VW considers this transmission unserviceable (sealed, closed) by anyone other than a dealer and requires the use of only VW automatic transmission fluid, P/N G052 162 A2.

Here is how to install a transmission dipstick so you can routinely check the fluid level, observe the fluid color and odor, and add fluid without special equipment or having to remove the belly pan.

APPROX. MODIFICATION TIME: 1 hour

PARTS LIST:

* All prices are pre tax.

NOTE:  The dipstick kit is currently not available.  VW has discontinued the dipstick and the the tube.  Several people are looking for a suitable replacement.  ModKit: The dipstick tube, “O” ring, and filter are in a ModKit from www.europarts-sd.com, (858) 451-0020 “EUROVAN PARTS LIST 1997-2000 VR6-12V Models Transmission Dipstick & Tube-OE VW Omitted by VW” $0.00
Individual Parts:
   Transmission dipstick, P/N 098321 431 F
   Transmission filter kit
   VW automatic transmission fluid VW P/N G 052 162 A2  
   Filler tube P/N 098 321 405 C
APPROX. TOTAL COST OF PARTS $0

INSTRUCTIONS:

Note: I followed the procedures listed in the Bentley manual for checking the automatic transmission fluid (ATF) level, including measuring the fluid temperature before opening the overflow tube.

Note: Having the fluid at the correct temp and running the gear selector through the gears are imperative in order to get the level correct.  When the transmission is cool it appears to be over filled, just as it does in any other automatic transmission.

Note: The filler tube (P/N 098 321 405 C) has a mounting bracket at the lower end and upper end.  The upper bracket will NOT fit around the 6-cylinder starter and must be removed from the tube.  The lower bracket is more than sufficient to secure the tube.  When you break off the upper mounting bracket be sure that you clean up any rough edges to prevent damaging any hoses or wiring which may rub on the dipstick tube.

NOTE - It is recommended that you install the dipstick at the same time as changing the ATF fluid and filter.  See the Automatic Transmission Service page for details on this procedure.

 CAUTION  - Before you remove the original black plastic filler tube, make sure that you clean the area around where it fits into the transmission case including the back side of the tube.  Normally lots of road dirt tends to pile up in this area.  Cleaning this ahead of time will prevent any dirt or debris from falling through the hole.  It will also insure that the new filler tube fully seats into the hole.  It's not super critical because any dirt will fall in the pan and will get picked up by the filter.
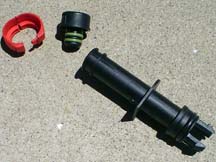
  1. Remove the existing fill tube by prying upwards with two small screwdrivers.  It is snapped in place and removes easily.  The photo on the right shows the original plastic tube with the plug and red seal cap taken off.  There is an O-ring on the black plastic tube down towards the bottom.

  2. Remove the O-ring from the tube and place it on the dipstick tube between the two ridges at the lower end of the tube.  A new O-ring should be used if possible.  These ridges are intended to position the O-ring in the correct location.

  3. Insert the dipstick tube into the case and secure it with the lower bracket.

  4. (If you are going to change the fluid and filter, now is a good time.)

  5. Check the fluid level with the dipstick.  The fluid level when warm (105°F) sits right between the two holes in the dipstick where it would normally.


Additional Modifications:

[ Arm Rest Removal ] [ Automatic Transfer Switch ] [ Awning ] [ Bathroom Shelf & Basin ] [ Battery Disconnect ]
[ Belly-Pan Cutout ] [ Bicycle Rack ] [ Cabinet Storage ] [ CB Radios ] [ Center Console ]
[ Closet Shelf ] [ Coach Door Seals ] [ Coach Entry Floor ] [ Computer Table ] [ Convex Door Mirror ]
[ Curtain Track ] [ Door Catch ] [ Daylight Running Lights ] [ DVD Conversion ] [ Entertainment Center ]
[ Entry Handrail ] [ Exterior Power Inlet ] [ Exterior Shower Drain ] [ Fuel Pump Jumpers ] [ Furnace Vent ]
[ Galley Faucet ] [ Generator Fuel Cutoff ] [ Granite Countertop ] [ Headboard ] [ Jack Handle Storage ]
[ LCD TV Conversion ] [ LED Bulbs ] [ Magnum Shooters ] [ Map Box ] [ Microwave Convection Oven ]
[ Propane Detector ] [ QD-H Conversion ] [ Rear Axle Stiffener ] [ Rear Couch Foam Roll ] [ Heat Control Label ]
[ Rear Seat Kick Panels ] [ Refrigerator DC Mode ] [ Refrigerator Conversion ] [ Roof Air 13,500 ] [ Roof Rack ]
[ Satellite Dish ] [ Sewer Dump Valve ] [ Sewer Hose Storage ] [ Shade Standoffs ] [ Shower Faucets ]
[ Shower Filter ] [ Simple Shoreline Conversion ] [ Skylight Panel ] [ Spare Tire Carrier ] [ Super Freezer ]
[ Throttle Body Cleaning ] [ Transmission Dip Stick ] [ Trunk Handle ] [ Wheel Covers ]  

[ HOME ]
No images, artwork, or photographs may be used without  permission.
Page Updated: 15 December 2016